
What happens when you send 1 DAI

You have 1 DAI.
Using a wallet's UI (like Metamask), you click enough buttons and fill enough text inputs to say that you're sending 1 DAI to 0xd8dA6BF26964aF9D7eEd9e03E53415D37aA96045 (that's vitalik.eth).
And hit send.
After some time the wallet says the transaction's been confirmed. All of sudden, Vitalik is now 1 DAI richer. WTF just happened?
Let's rewind. And replay in slow motion.
Ready?
Index
- Building the transaction
- Reception
- Propagation
- Work preparation and transaction inclusion
- Execution
- Sealing the block
- Broadcasting the block
- Verifying the block
- Retrieving the transaction
- Afterword
Building the transaction
Wallets are pieces of software that facilitate sending transactions to the Ethereum network.
A transaction is just a way to tell the Ethereum network that you, as a user, want to execute an action. In this case that'd be sending 1 DAI to Vitalik. And a wallet (e.g., Metamask) helps build such transaction in a relatively beginner-friendly way.
Let's first go over the transaction that a wallet would build. It can be represented as an object with fields and their corresponding values.
Ours will start looking like this:
{
    "to": "0x6b175474e89094c44da98b954eedeac495271d0f",
    // [...]
}
Where the field to states the target address. In this case, 0x6b175474e89094c44da98b954eedeac495271d0f is the address of the DAI smart contract.
Wait, what?
Weren't we supposed to be sending 1 DAI to Vitalik ? Shouldn't to be Vitalik's address?
Well, no. To send DAI, one must essentially craft a transaction that executes a piece of code stored in the blockchain (the fancy name for Ethereum's database) that will update the recorded balances of DAI. Both the logic and related storage to execute such update is held in an immutable and public computer program stored in Ethereum's database. The DAI smart contract.
Hence, you want to build a transaction that tells the contract "hey buddy, update your internal balances, taking 1 DAI out of my balance, and adding 1 DAI to Vitalik's balance". In Ethereum jargon, the phrase "hey buddy" translates to setting DAI's address in the to field of the transaction.
However, the to field is not enough. From the information you provide in your favorite wallet's UI, the wallet fills up several other fields to build a well-formatted transaction.
{
    "to": "0x6b175474e89094c44da98b954eedeac495271d0f",
    "amount": 0,
    "chainId": 31337,
    "nonce": 0,
    // [...]
}
It fills the amount field with a 0. So you're sending 1 DAI to Vitalik, and you neither use Vitalik's address nor put a 1 in the amount field. That's how tough life is (and we're just warming up). The amount field is actually included in a transaction to specify how much ETH (the native currency of Ethereum) you're sending along your transaction. Since you don't want to send ETH right now, then the wallet would correctly set that field to 0.
As of the chainId, it is a field that specifies the chain where the transaction is to be executed. For Ethereum Mainnet, that is 1. However, since I will be running this experiment on a local copy of mainnet, I will use its chain ID: 31337. Other chains have other identifiers.
What about the nonce field ? That's a number that should be increased every time you send a transaction to the network. It acts a defense mechanism to avoid replaying issues. Wallets usually set it for you. To do so, they query the network asking what's the latest nonce your account used, and then set the current transaction's nonce accordingly. In the example above it's set to 0, though in reality it will depend on the number of transactions your account has executed.
I just said that the wallet "queries the network". What I mean is that the wallet executes a read-only call to an Ethereum node, and the node answers with the requested data. There are multiple ways to read data from an Ethereum node, depending on the node's location, and what kind of APIs it exposes.
Let's imagine the wallet has direct network access to an Ethereum node. More commonly, wallets interact with third-party providers (like Infura, Alchemy, QuickNode and many others). Requests to interact with the node follow a special protocol to execute remote calls. Such protocol is called JSON-RPC.
A request for a wallet that is attempting to fetch an account's nonce would resemble something like this:
POST / HTTP/1.1
connection: keep-alive
Content-Type: application/json
content-length: 124

{
    "jsonrpc":"2.0",
    "method":"eth_getTransactionCount",
    "params":["0x6fC27A75d76d8563840691DDE7a947d7f3F179ba","latest"],
    "id":6
}
---
HTTP/1.1 200 OK
Content-Type: application/json
Content-Length: 42

{"jsonrpc":"2.0","id":6,"result":"0x0"}
Where 0x6fC27A75d76d8563840691DDE7a947d7f3F179ba would be the sender's account. From the response you can see that its nonce is 0.
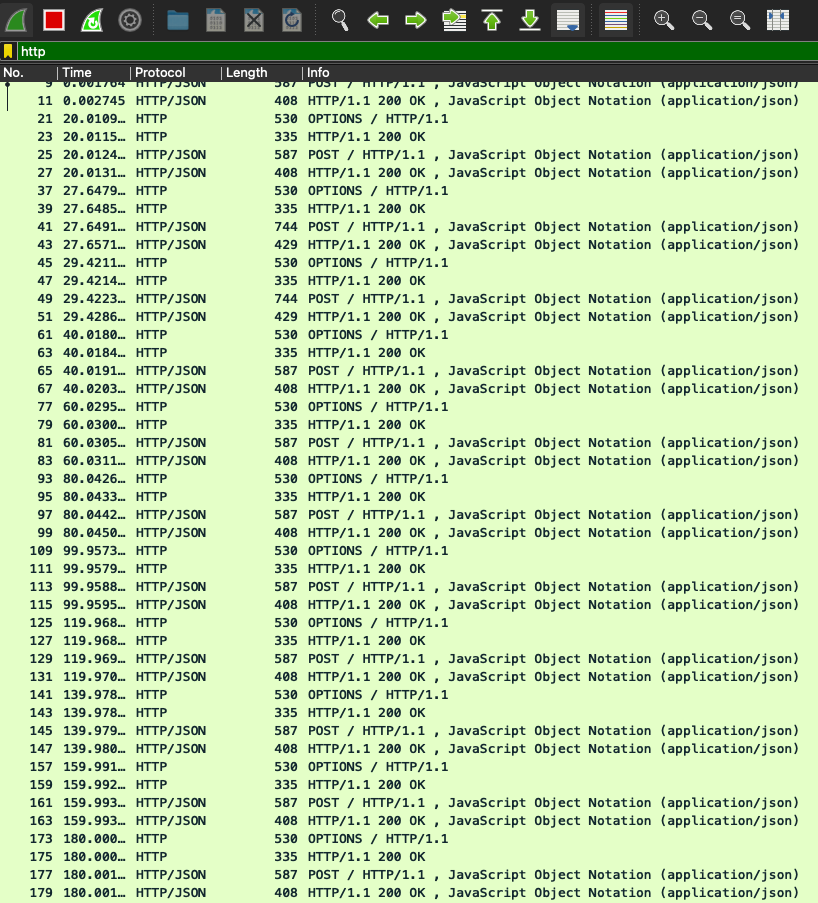
Wallets fetch data using network requests (in this case, via HTTP) to hit JSON-RPC endpoints exposed by nodes. Above I included just one, but in practice a wallet can query whatever data they need to build a transaction. Don't be surprised if in real-life cases you notice more network requests to lookup other stuff. For instance, following is a snippet of Metamask traffic hitting a local test node in a couple of minutes:
The transaction's data field
DAI is a smart contract. Its main logic is implemented at address 0x6b175474e89094c44da98b954eedeac495271d0f in Ethereum mainnet.
More specifically, DAI is an ERC20-compliant fungible token - quite a special type of contract. This means that at least DAI should implement the interface detailed in the ERC20 specification. In (somewhat stretched) web2 jargon, DAI is an immutable open-source web service running on Ethereum. Given it follows the ERC20 spec, it's possible to know in advance (without necessarily looking at the source code) the exact exposed endpoints to interact with it.
Short side note: not all ERC20 tokens are created equal. Implementing a certain interface (which facilitates interactions and integrations) certainly does not guarantee behavior. Still, for this exercise we can safely assume that DAI is quite a standard ERC20 token in terms of behavior.
There are a bunch of functions in the DAI smart contract (source code available here), many of them directly taken from the ERC20 spec. Of particular interest is the external transfer function.
contract Dai is LibNote {
    ...
    function transfer(address dst, uint wad) external returns (bool) {
        ...
    }
}
This function allows anyone holding DAI tokens to transfer some of them to another Ethereum account. Its signature is transfer(address,uint256). Where the first parameter is the address of the receiver account, and the second an unsigned integer representing the amount of tokens to be transferred.
For now let's not focus on the specifics of the function's behavior. Just trust me when I tell you that in its happy path, the function reduces the sender's balance by the passed amount, and then increases the receiver's accordingly.
This is important because when building a transaction to interact with a smart contract, one should know which function of the contract is to be executed. And what parameters are to be passed. It's like if in web2 you wanted to send a POST request to a web API. You'd most likely need to specify the exact URL with its parameters in the request. This is the same. We want to transfer 1 DAI, so we must know how to specify in a transaction that it is supposed to execute the transfer function on the DAI smart contract.
Luckily, it's SO straightforward and intuitive.
Joking. It's not. This is what you must include in your transaction to send 1 DAI to Vitalik (remember, address 0xd8dA6BF26964aF9D7eEd9e03E53415D37aA96045):
{
    // [...]
    "data": "0xa9059cbb000000000000000000000000d8da6bf26964af9d7eed9e03e53415d37aa960450000000000000000000000000000000000000000000000000de0b6b3a7640000"
}
Let me explain.
Aiming to ease integrations and have a standardize way to interact with smart contracts, the Ethereum ecosystem has (kind of) settled into adopting what's called the "Contract ABI specification" (ABI stands for Application Binary Interface). In common use cases, and I stress, IN COMMON USE CASES, in order to execute a smart contract function you must first encode the call following the Contract ABI specification. More advanced use cases may not follow this spec, but we're definitely not going down that rabbit hole. Suffice to say that regular smart contracts programmed with Solidity, such as DAI, usually follow the Contract ABI spec.
What you can see above are the resulting bytes of ABI-encoding a call to transfer 1 DAI to address 0xd8dA6BF26964aF9D7eEd9e03E53415D37aA96045 with DAI's transfer(address,uint256) function.
There are a number of tools out there to ABI-encode stuff, and in some way or another most wallets are implementing ABI-encoding to interact with contracts. For the sake of the example, we can just verify that the above sequence of bytes is correct using a command-line utility called cast, which is able to ABI-encode the call with the specific arguments:
$ cast calldata "transfer(address,uint256)" 0xd8dA6BF26964aF9D7eEd9e03E53415D37aA96045 1000000000000000000

0xa9059cbb000000000000000000000000d8da6bf26964af9d7eed9e03e53415d37aa960450000000000000000000000000000000000000000000000000de0b6b3a7640000
Anything bugging you ? What's wrong ?
Ooooh, sorry, yeah. That 1000000000000000000. Honestly I would really love to have a more robust argument for you here. The thing is: lots of ERC20 tokens are represented with 18 decimals. Such as DAI. Yet we can only use unsigned integers. So 1 DAI is actually stored as 1 * 10^18 - which is 1000000000000000000. Deal with it.
We have a beautiful ABI-encoded sequence of bytes to be included in the data field of the transaction. Which by now looks like:
{
    "to": "0x6b175474e89094c44da98b954eedeac495271d0f",
    "amount": 0,
    "chainId": 31337,
    "nonce": 0,
    "data": "0xa9059cbb000000000000000000000000d8da6bf26964af9d7eed9e03e53415d37aa960450000000000000000000000000000000000000000000000000de0b6b3a7640000"
}
We will revisit the contents of this data field once we get to the actual execution of the transaction.
Gas wizardry
Next step is deciding how much to pay for the transaction. Because remember that all transactions must pay a fee to network of nodes that takes the time and resources to execute and validate them.
The cost of executing a transaction is paid in ETH. And the final amount of ETH will depend on how much net gas your transaction consumes (that is, how computationally expensive it is), how much you're willing to pay for each gas unit spent, and how much the network is willing to accept at a minimum.
From a user perspective, bottomline usually is that the more one pays, the faster transactions are included. So if you want to pay Vitalik 1 DAI in the next block, you'll probably need to set a higher fee than if you're willing to wait a couple of minutes (or longer, sometimes way longer), until gas is cheaper.
Different wallets may take different approaches to deciding how much to pay for gas. I'm not aware of a single bullet-proof mechanism used by everyone. Strategies to determine the right fees may involve querying gas-related information from nodes (such as the minimum base fee accepted by the network).
For example, in the following requests you can see the Metamask browser extension sending a request to a local test node for gas fee data when building a transaction:
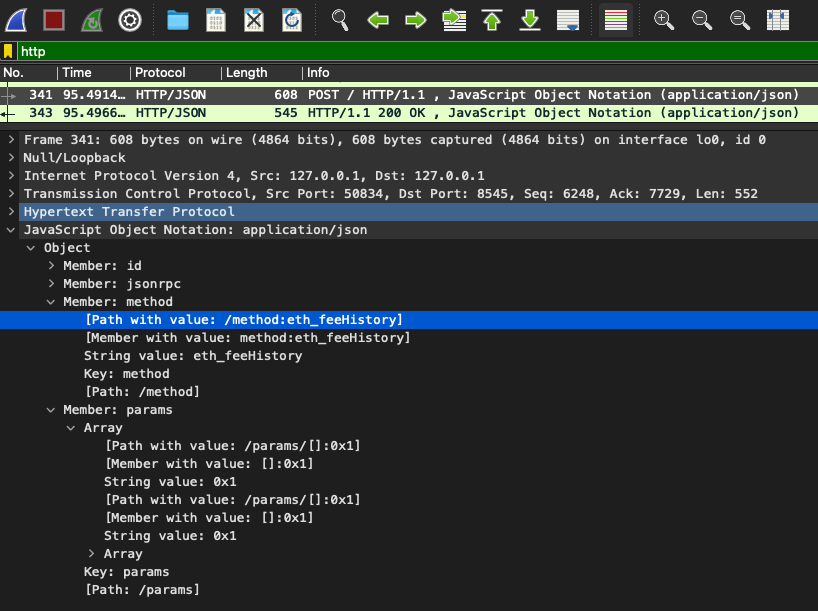
And the simplified request-response look like:
POST / HTTP/1.1
Content-Type: application/json
Content-Length: 99

{
    "id":3951089899794639,
    "jsonrpc":"2.0",
    "method":"eth_feeHistory",
    "params":["0x1","0x1",[10,20,30]]
}
---
HTTP/1.1 200 OK
Content-Type: application/json
Content-Length: 190

{
    "jsonrpc":"2.0",
    "id":3951089899794639,
    "result":{
        "oldestBlock":"0x1",
        "baseFeePerGas":["0x342770c0","0x2da4d8cd"],
        "gasUsedRatio":[0.0007],
        "reward":[["0x59682f00","0x59682f00","0x59682f00"]]
    }
}
The eth_feeHistory endpoint is exposed by some nodes to allow querying transaction fee data. If you're curious, read here or play with it here, or see the spec here.
Popular wallets also use more sophisticated off-chain services to fetch gas price estimations and suggest sensible values to their users. Here's one example of a wallet hitting a public endpoint of a web service, and receiving a bunch of useful gas-related data:
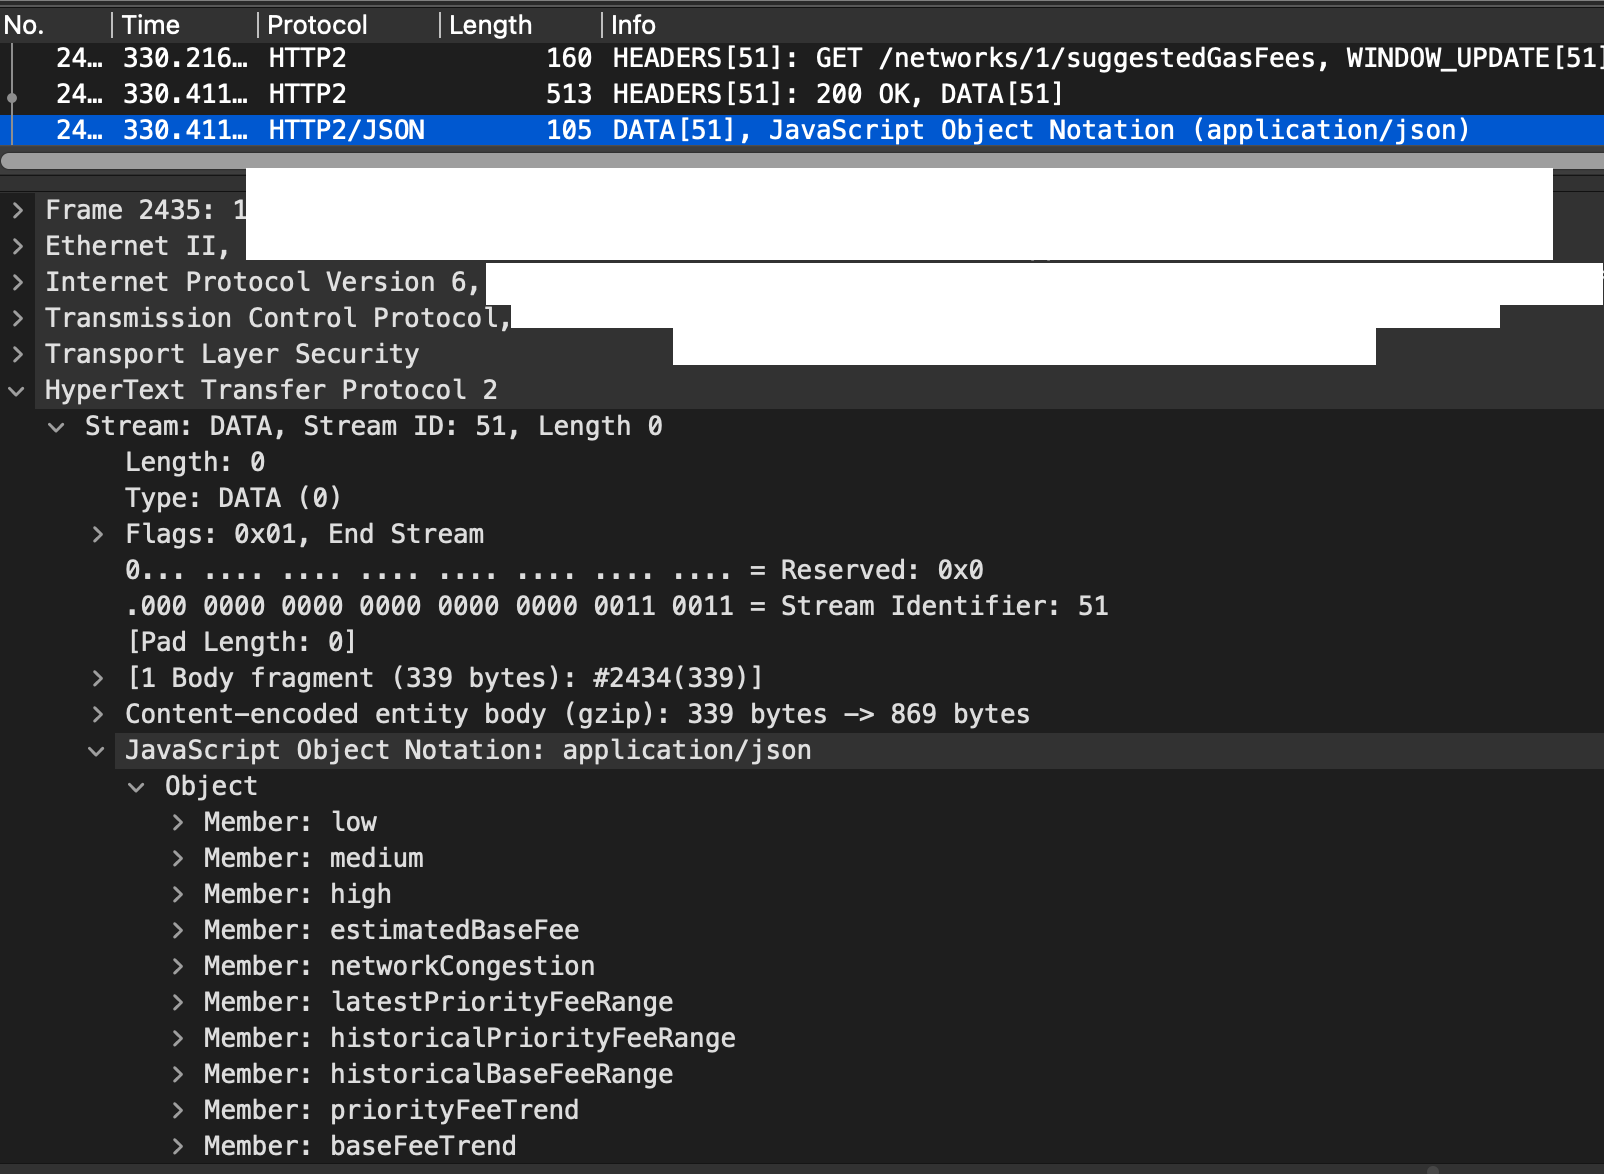
Take a look at a snippet of the response:

Cool, right?
Anyway, hopefully you're getting familiar with the idea that setting the gas fee prices is not straightforward, and it is a fundamental step for building a successful transaction. Even if all you want to do is send 1 DAI. Here is an interesting introductory guide to dig deeper into some of the mechanisms involved to set more accurate fees in transactions.
After some initial context, let's go back to the actual transaction now. There are three gas-related fields that need to be set:
{
    "maxPriorityFeePerGas": ...,
    "maxFeePerGas": ...,
    "gasLimit": ...,
}
Wallets will use some of the mentioned mechanisms to fill the first two fields for you. Interestingly, whenever a wallet UI lets you choose between some version of "slow", "regular" or "fast" transactions, it's actually trying to decide on what values are the most appropriate for those exact parameters. Now you can better understand the contents of the JSON-formatted response received by a wallet that I showed you a couple of paragraphs back.
To determine the third field's value, the gas limit, there's a handy mechanism that wallets may use to simulate a transaction before it is really submitted. It allows them to closely estimate how much gas a transaction would consume, and therefore set a reasonable gas limit. On top of providing you with an estimate on the final USD cost of the transaction.
Why not just set an absurdly large gas limit ? To defend your funds, of course. Smart contracts may have arbitrary logic, you being the one paying for its execution. By choosing a sensible gas limit right from the start in your transaction, you protect yourself against ugly scenarios that may drain all your account's ETH funds in gas fees.
Gas estimations can be done using a node's endpoint called eth_estimateGas. Before sending 1 DAI, a wallet can leverage this mechanism to simulate your transaction, and determine what's the right gas limit for your DAI transfer. This is what a request-response from a wallet might look like.
POST / HTTP/1.1
Content-Type: application/json

{
    "id":2697097754525,
    "jsonrpc":"2.0",
    "method":"eth_estimateGas",
    "params":[
        {
            "from":"0x6fC27A75d76d8563840691DDE7a947d7f3F179ba",
            "value":"0x0",
            "data":"0xa9059cbb000000000000000000000000d8da6bf26964af9d7eed9e03e53415d37aa960450000000000000000000000000000000000000000000000000de0b6b3a7640000",
            "to":"0x6b175474e89094c44da98b954eedeac495271d0f"
        }
    ]
}
---
HTTP/1.1 200 OK
Content-Type: application/json

{"jsonrpc":"2.0","id":2697097754525,"result":"0x8792"}
In the response you can see that the transfer would take approximately 34706 gas units.
Let's incorporate this information to the transaction payload:
{
    "to": "0x6b175474e89094c44da98b954eedeac495271d0f",
    "amount": 0,
    "chainId": 31337,
    "nonce": 0,
    "data": "0xa9059cbb000000000000000000000000d8da6bf26964af9d7eed9e03e53415d37aa960450000000000000000000000000000000000000000000000000de0b6b3a7640000",
    "maxPriorityFeePerGas": 2000000000,
    "maxFeePerGas": 120000000000,
    "gasLimit": 40000
}
Remember that the maxPriorityFeePerGas and maxFeePerGas will ultimately depend on the network conditions at the moment of sending the transaction. Above I'm just setting somewhat arbitrary values for the sake of this example. As of the value set for the gas limit, I just incremented the estimate a bit to fall on the safe side.
Access list and transaction type
Let's briefly comment on two additional fields that are set in your transaction.
First, the accessList field. Advanced use cases or edge scenarios may require the transaction to specify in advance the account addresses and contracts' storage slots to be accessed, thus making it somewhat cheaper.
However, it may not be straightforward to build such list in advance, and currently the gas savings may not be not so significant. Particularly for simple transactions like sending 1 DAI. Therefore, we can just set it to an empty list. Although remember that it does exist for a reason, and it may become more relevant in the future.
Second, the transaction type. It is specified in the type field. The type is an indicator of what's inside the transaction. Our will be a type 2 transaction - because its following the format specified here.
{
    "to": "0x6b175474e89094c44da98b954eedeac495271d0f",
    "amount": 0,
    "chainId": 31337,
    "nonce": 0,
    "data": "0xa9059cbb000000000000000000000000d8da6bf26964af9d7eed9e03e53415d37aa960450000000000000000000000000000000000000000000000000de0b6b3a7640000",
    "maxPriorityFeePerGas": 2000000000,
    "maxFeePerGas": 120000000000,
    "gasLimit": 40000,
    "accessList": [],
    "type": 2
}
Signing the transaction
How can nodes know that it is your account, and not somebody else's, who is sending a transaction ?
We've come to the critical step of building a valid transaction: signing it.
Once a wallet has collected enough information to build the transaction, and you hit SEND, it will digitally sign your transaction. How ? Using your account's private key (that your wallet has access to), and a cryptographic algorithm involving curvy shapes called ECDSA.
For the curious, what's actually being signed is the keccak256 hash of the concatenation between the transaction's type and the RLP encoded content of the transaction.
keccak256(0x02 || rlp([chainId, nonce, maxPriorityFeePerGas, maxFeePerGas, gasLimit, to, amount, data, accessList]))
You shouldn't be so knowledgeable in cryptography to understand this though. Put simply, this process seals the transaction. It makes it tamper-proof by putting a smart-ass stamp on it that only your private key could have produced. And from now on anyone with access to that signed transaction (for example, Ethereum nodes) can cryptographically verify that it was your account that produced it.
Just in case: signing is not encrypting. Your transactions are always in plaintext. Once they go public, anyone can make sense out of their contents.
The process of signing the transaction produces, no surprise, a signature. In practice: a bunch of weird unreadable values. These travel along the transaction, and you'll usually find them referred to as v, r and s. If you want to dig deeper on what these actually represent, and their importance to recover your account's address, the Internet is your friend.
You can get a better idea on what signing looks like when implemented by checking out the @ethereumjs/tx package. Also using the ethers package for some utilities. As an extremely simplified example, signing the transaction to send 1 DAI could look like this:
const { FeeMarketEIP1559Transaction } = require("@ethereumjs/tx");

const txData = {
    to: "0x6b175474e89094c44da98b954eedeac495271d0f",
    amount: 0,
    chainId: 31337,
    nonce: 0,
    data: "0xa9059cbb000000000000000000000000d8da6bf26964af9d7eed9e03e53415d37aa960450000000000000000000000000000000000000000000000000de0b6b3a7640000",
    maxPriorityFeePerGas: ethers.utils.parseUnits('2', 'gwei').toNumber(),
    maxFeePerGas: ethers.utils.parseUnits('120', 'gwei').toNumber(),
    gasLimit: 40000,
    accessList: [],
    type: 2,
};

const tx = FeeMarketEIP1559Transaction.fromTxData(txData);
const signedTx = tx.sign(Buffer.from(process.env.PRIVATE_KEY, 'hex'));

console.log(signedTx.v.toString('hex'));
// 1

console.log(signedTx.r.toString('hex'));
// 57d733933b12238a2aeb0069b67c6bc58ca8eb6827547274b3bcf4efdad620a

console.log(signedTx.s.toString('hex'));
// e49937ec81db89ce70ebec5e51b839c0949234d8aad8f8b55a877bd78cc293
The resulting object would look like:
{
    "to": "0x6b175474e89094c44da98b954eedeac495271d0f",
    "amount": 0,
    "chainId": 31337,
    "nonce": 0,
    "data": "0xa9059cbb000000000000000000000000d8da6bf26964af9d7eed9e03e53415d37aa960450000000000000000000000000000000000000000000000000de0b6b3a7640000",
    "maxPriorityFeePerGas": 2000000000,
    "maxFeePerGas": 120000000000,
    "gasLimit": 40000,
    "accessList": [],
    "type": 2,
    "v": 1,
    "r": "57d733933b12238a2aeb0069b67c6bc58ca8eb6827547274b3bcf4efdad620a",
    "s": "e49937ec81db89ce70ebec5e51b839c0949234d8aad8f8b55a877bd78cc293",
}
Serialization
The next step is serializing the signed transaction. That means encoding the pretty object above into a raw sequence of bytes, such that it can be sent to the Ethereum network and consumed by the receiving node.
The encoding method chosen by Ethereum is called RLP. The way the transaction is encoded is as follows:
0x02 || rlp([chainId, nonce, maxPriorityFeePerGas, maxFeePerGas, gasLimit, to, value, data, accessList, v, r, s])
Where the initial byte is the transaction type.
Building upon the previous code snippet, you can actually see the serialized transaction adding this:
console.log(signedTx.serialize().toString('hex'));
// 02f8b1827a69808477359400851bf08eb000829c40946b175474e89094c44da98b954eedeac495271d0f80b844a9059cbb000000000000000000000000d8da6bf26964af9d7eed9e03e53415d37aa960450000000000000000000000000000000000000000000000000de0b6b3a7640000c001a0057d733933b12238a2aeb0069b67c6bc58ca8eb6827547274b3bcf4efdad620a9fe49937ec81db89ce70ebec5e51b839c0949234d8aad8f8b55a877bd78cc293
That is the actual payload to send 1 DAI to Vitalik on my local copy of the Ethereum mainnet.
Submitting the transaction
Once built, signed and serialized, the transaction must be sent to an Ethereum node.
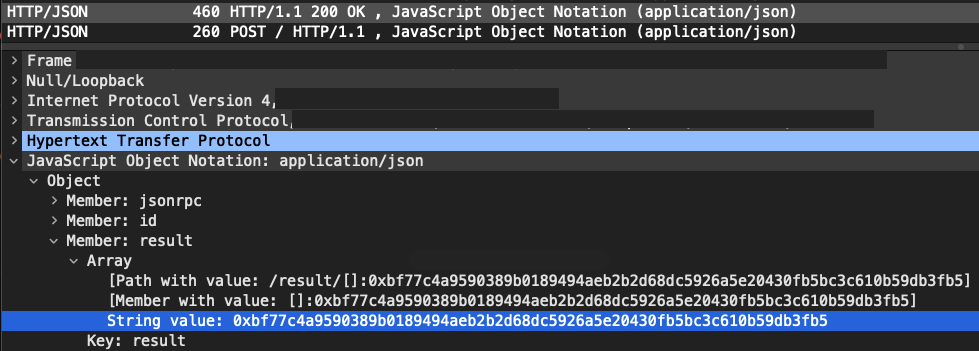
There's a handy JSON-RPC endpoint that nodes may expose where they can receive such requests. It's called eth_sendRawTransaction. Here's the network traffic of a wallet employing it upon submitting the transaction:
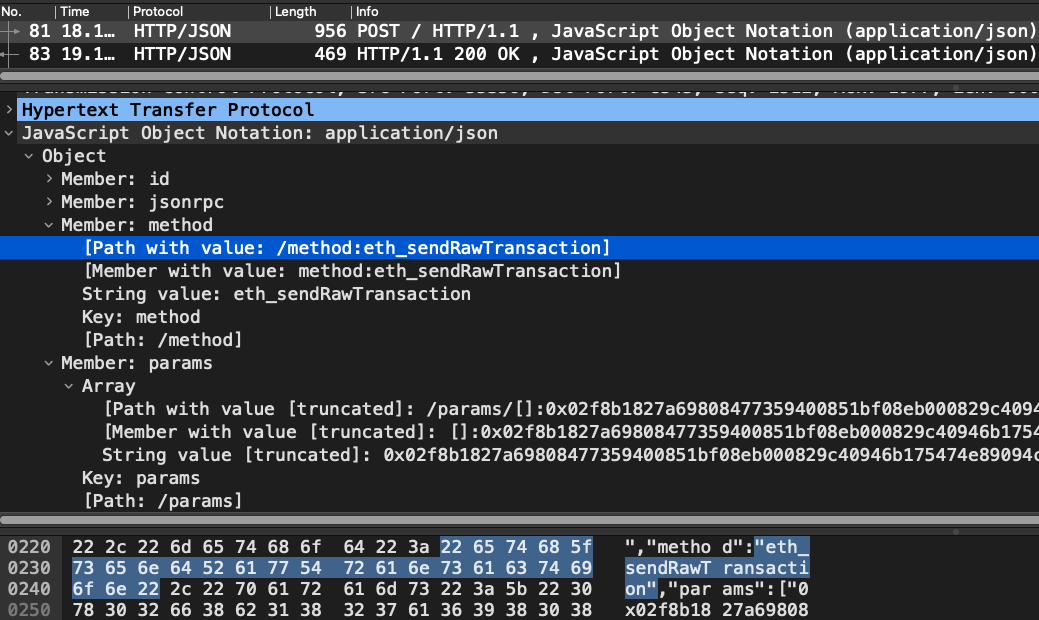
The summarized request-response looks like:
POST / HTTP/1.1
Content-Type: application/json
Content-Length: 446

{
    "id":4264244517200,
    "jsonrpc":"2.0",
    "method":"eth_sendRawTransaction",
    "params":["0x02f8b1827a69808477359400851bf08eb000829c40946b175474e89094c44da98b954eedeac495271d0f80b844a9059cbb000000000000000000000000d8da6bf26964af9d7eed9e03e53415d37aa960450000000000000000000000000000000000000000000000000de0b6b3a7640000c001a0057d733933b12238a2aeb0069b67c6bc58ca8eb6827547274b3bcf4efdad620a9fe49937ec81db89ce70ebec5e51b839c0949234d8aad8f8b55a877bd78cc293"]
}
---
HTTP/1.1 200 OK
Content-Type: application/json
Content-Length: 114

{
    "jsonrpc":"2.0",
    "id":4264244517200,
    "result":"0xbf77c4a9590389b0189494aeb2b2d68dc5926a5e20430fb5bc3c610b59db3fb5"
}
The result included in the response contains the transaction's hash: bf77c4a9590389b0189494aeb2b2d68dc5926a5e20430fb5bc3c610b59db3fb5. This 32-bytes-long sequence of hex characters is the unique identifier for the submitted transaction.
Reception
How should we go about figuring out what happens when an Ethereum node receives the serialized signed transaction ?
Some might ask on Twitter, others may read some Medium articles. Other may even read documentation. Shame!
There's only one place to find the truth: at the source. Let's use go-ethereum v1.10.18 (a.k.a. Geth), a popular implementation of an Ethereum node (an "execution client" once Ethereum moves to Proof-of-Stake). From now on, I'll be including links to Geth's source code for you to follow along.
Upon receiving the JSON-RPC call on its eth_sendRawTransaction endpoint, the node needs to make sense out of the serialized transaction included in the request's body. So it begins with deserializing the transaction. From now on the node will have easier access to the transaction's fields.
At this point the node already starts validating the transaction. First, ensuring that the transaction's fee (i.e., price * gas limit) does not go above the maximum that the node is willing to accept (apparently, by default this is 1 ether). And then, ensuring that the transaction is replay-protected (following EIP 155 - remember the chainID field we set in the transaction?), or that the node is willing to accept unprotected transactions.
The next steps consists of sending the transaction to the transaction pool (a.k.a. the mempool). Put simply, this pool represents the set of transactions that the node is aware of at a specific moment. As far the node knows, these haven't been included in the blockchain yet.
Before really including the transaction in the pool, the node checks that it doesn't already know about it. And that its ECDSA signature is valid. Discarding the transaction otherwise.
Then the heavy mempool stuff begins. As you may notice, there's lots of non-trivial logic to ensure that the transaction pool is all happy and healthy.
There's quite a number of important validations performed here. Such as the gas limit being below the block gas limit, or the transaction's size not exceeding the maximum allowed, or the nonce being the expected one, or the sender having enough funds to cover potential costs (i.e., value + gas limit * price), and more.
While we could go on, we're not here to become mempool experts. Even if we wanted to, we'd need to consider that, as long as they follow the network consensus rules, each node operator may take different approaches to mempool management. That means performing special validations or following custom transaction prioritization rules. In the interest of just sending 1 DAI, we can treat the mempool as a mere set of transactions eagerly waiting to be picked up and be included in a block.
After successfully adding the transaction to the pool (and doing internal logging stuff), the node returns the transaction hash. Exactly what we saw being returned in the JSON-RPC request-response earlier 😎
Inspecting the mempool
If you send the transaction via Metamask or any similar wallet that is by default connected to traditional nodes, at some point it will land on public nodes' mempools. You can make sure of this by inspecting mempools by yourself.
There's a handy endpoint some nodes expose, called eth_newPendingTransactionFilter. Perhaps a good-old friend of frontrunning bots. Periodically querying this endpoint should allow us to observe the transaction to send 1 DAI walking into the mempool of a local test node before being included in the chain.
In Javascript code, this can be accomplished with:
const hre = require("hardhat");

hre.ethers.provider.on('pending', async function (tx) {
    // do something with the transaction
});
To see the actual eth_newPendingTransactionFilter call, we can just inspect the network traffic:
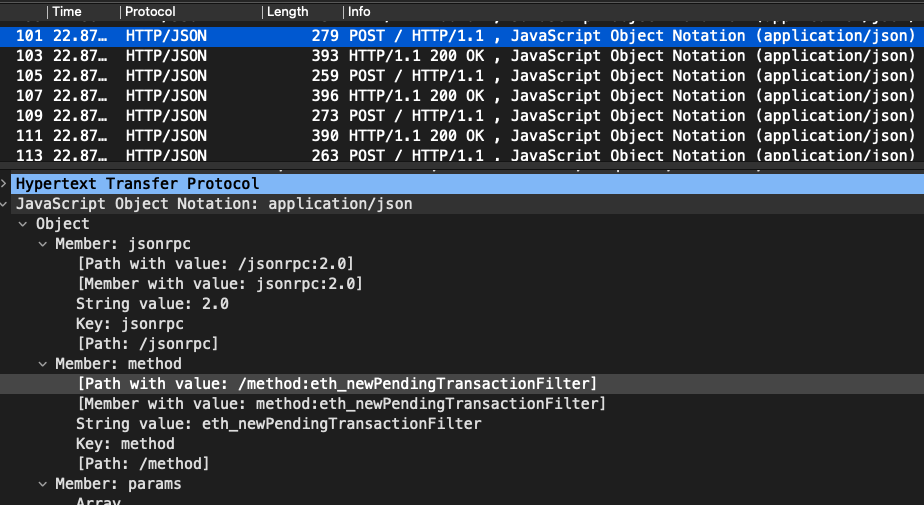
From now on, the script will (automatically) poll changes in the mempool. Here's the first of many subsequent periodic calls asking for changes:

And after receiving the transaction, here's the node finally answering with its hash:
The summarized request-response looks like:
POST / HTTP/1.1
Content-Type: application/json
content-length: 74

{
    "jsonrpc":"2.0",
    "method":"eth_getFilterChanges",
    "params":["0x1"],
    "id":58
}
---
HTTP/1.1 200 OK
Content-Type: application/json
Content-Length: 105

{
    "jsonrpc":"2.0",
    "id":58,
    "result":["0xbf77c4a9590389b0189494aeb2b2d68dc5926a5e20430fb5bc3c610b59db3fb5"]
}
Earlier I said "traditional nodes" without explaining much. What I mean is that there are more specialized nodes that feature private mempools. They allow users to "hide" transactions from the public before they are included in a block.
Regardless of the specifics, such mechanisms usually consist of establishing private channels between transaction senders and block builders. The Flashbots Protect service is one notable example. The practical consequence is that even if you're monitoring mempools with the method shown above, you won't be able to fetch transactions that make it to block builders via private channels.
Assume that the transaction to send 1 DAI is submitted to the network via common channels without leveraging this kind of services.
Propagation
For the transaction to be included in a block, it somehow needs to reach the nodes able to build and propose it. In Proof-of-Work Ethereum, these are called miners. In Proof-of-Stake Ethereum, validators. Though reality tends to be a bit more complicated. Be aware that there may be ways in which block building can be outsourced to specialized services.
As a common user, you shouldn't need to know who these block producers are, nor where they are located. Instead, you may simply send a valid transaction to any regular node in the network, have it included in the transaction pool, and let the peer-to-peer protocols do their thing.
There are a number of these p2p protocols interconnecting Ethereum nodes. They allow, among other things, the frequent exchange of transactions.
Right from the start all nodes are listening and broadcasting transactions along with their peers (by default, maximum 50 peers).
Once a transaction reaches the mempool, it is sent to all connected peers that do not already know about the transaction.
To favor efficiency, only a random subset of connected nodes (the square root 🤓) are sent the full transaction. The rest is only sent the transaction hash. These could request back the full transaction if needed.
A transaction cannot linger in a node's mempool forever. If it's not first dropped for other reasons (e.g., the pool is full and the transaction is underpriced, or it gets replaced with a new one with higher nonce/price), it may be automatically removed after a certain period of time (by default, 3 hours).
Valid transactions in the mempool that are considered ready to be picked up and processed by a block builder are tracked in a list of pending transactions. This data structure can be queried by block builders to obtain processable transactions that are allowed to make it into the chain.
Work preparation and transaction inclusion
The transaction should reach a mining node (at least at the time of writing) after navigating mempools. Nodes of this type are particularly heavy multitaskers. For those familiar with Golang, this translates to quite a number of go routines and channels in the mining-related logic. For those unfamiliar with Golang, this means that miners regular operations cannot be explained as linearly as I'd like.
This section's goal is twofold. First, understanding how and when our transaction is picked up from the mempool by a miner. Second, finding out at which point the transaction's execution starts.
At least two relevant things happen when the node's mining component is initialized. One, it starts listening for the arrival of new transactions to the mempool. Two, some fundamental loops are triggered.
In Geth's jargon, the act of building a block with transactions and sealing it is called "committing work". Thus we want to understand under which circumstances this happens.
Focus on the "new work" loop. That's a standalone routine that, upon the node receiving different kind of notifications, will trigger the commit of work. The trigger essentially entails sending a work requirement to another of the node's active listeners (running in the miners's "main" loop). When such work requirement is received, the commit of work begins.
The node starts with some initial preparation. Mainly consisting of building the block's header. This includes tasks like finding the parent block, ensuring the timestamp of the block being built is correct, setting the block number, the gas limit, the coinbase address and the base fee.
Afterwards, the consensus engine is invoked for the header's "consensus preparation". This calculates the right block difficulty (depending on the current version of the network). If you've ever heard of Ethereum's "difficulty bomb", there you have it.
The block sealing context is created next. Other actions aside, this consists of fetching the last known state. This is the state against which the first transaction in the block being built is going to be executed. That might be our transaction sending 1 DAI.
Having prepared the block, it is now filled with transactions.
We've finally reached the point in which our pending transaction, so far just comfortably sitting in the node's mempool, is picked up along others.
By default transactions are ordered within a block by price and nonce. For our case, the transaction's position within the block is practically irrelevant.
Now the sequential execution of these transactions begins. One transaction is executed after the other, each building upon the resulting state of the previous one.
Execution
An Ethereum transaction can be thought of as a state transition.
State 0: you have 100 DAI, and Vitalik has 100 as well.
Transaction: you send 1 DAI to Vitalik.
State 1: you have 99 DAI, and Vitalik has 101.
Hence, executing a transaction entails applying a sequence of operations to the current state of the blockchain. Producing a new (different) state as a result. This will be considered the new current state until a another transaction comes in.
In reality this is far more interesting (and complex). Let's see.
Preparation (part 1)
In Geth's jargon, miners commit transactions in the block. The act of committing a transaction is done in an environment. Such environment contains, among other things, a given state.
So in short, committing a transaction is essentially: (1) remembering the current state, (2) modifying it by applying the transaction, (3) depending on the transaction's success, either accepting the new state or rolling back to the original one.
The juicy stuff happens in (2): applying the transaction.
First thing to notice is that the transaction is turned into a "message". If you're familiar with Solidity, where you are usually writing things like msg.data or msg.sender, finally reading "message" in Geth's code is THE sign on the road welcoming you into friendly lands.
Inspecting what a message looks like quickly leads to notice at least one difference with the transaction. A message has a from field! This field is the signer's Ethereum address, which is derived from the public signature included in the transaction (remember the weird v, r and s fields?).
Now the environment for execution is further prepared. First, the block-related context is created, which includes stuff like block number, timestamp, the coinbase address and the block gas limit. And then...
The Ethereum Virtual Machine (EVM), the stack-based 256-bit computing engine in charge of executing the transaction, shows up all chill like everything is cool man, cool, and starts putting some clothes on. Yeap, it was naked. It's the EVM, what were you expecting?
The EVM is a machine. And as a machine, it has a set of instructions (a.k.a. opcodes) it can execute. The instruction set has changed over the years. So there has to be some piece of code telling the EVM which opcodes it should use today. And behold, there is. When the EVM instances its interpreter, it chooses the correct set of opcodes, depending on the version being used.
Lastly, two final steps prior to real execution. The EVM's transaction context is created (ever used tx.origin or tx.gasPrice in your Solidity smart contracts?), and the EVM is given access to the current state.
Preparation (part 2)
It's turn for the EVM to perform the state transition. Given a message, an environment and the original state, it will use a limited set of instructions to move to a new state. One in which Vitalik has 1 additional DAI 💰.
Before applying the state transition, the EVM must make sure that it abides to specific consensus rules. Let's see how that's done in detail.
Validation begins in what Geth calls the "pre-check". It consists of:
- Validating the message's nonce. It must match the nonce of the message's
fromaddress. Also, it must not be the maximum possible nonce (by checking whether incrementing the nonce by one causes an overflow). - Making sure that the account corresponding to the message's
fromaddress does not have code. That is, that the transaction origin is an externally-owned account (EOA). Thus abiding by the EIP 3607 spec. - Validating that the
maxFeePerGas(thegasFeeCapin Geth) andmaxPriorityFeePerGas(thegasTipCapin Geth) fields set in the transaction are within expected bounds. Moreover, that the priority fee is not greater than the max fee. And that themaxFeePerGasis greater than the current block's base fee. - Buying gas. In turn checking that the account can pay for all the gas it intends to consume. And that there's enough gas left in the block to process the transaction. Finally making the account pay in advance for the gas (don't worry, there're refund mechanisms later).
Next, the EVM accounts for the "intrinsic gas" that the transaction consumes. There are a few factors to consider when calculating intrinsic gas. For starters, whether the transaction is a contract creation. Ours is not, so the gas starts at 21000 units. Afterwards, the amount of non-zero bytes in the message's data field is also taken into consideration. 16 units are charged per non-zero byte (following this specification). Only 4 units are charged for each zero byte. Finally, some more gas would be accounted in advance if we provided access lists.
We set the value field of the transaction to zero. Had we specified a positive value, now would be the moment for the EVM to check whether the sender account actually has enough balance to execute the ETH transfer. Furthermore, had we set access lists, now they would be initialized in state.
The transaction being executed is not creating a contract. The EVM knows it because the to field is not zero. Therefore, it will already increment the sender's account nonce by one, and execute a call.
The call will go from the from to the to message's addresses, passing along the data, no value, and whatever remaining gas is left after consuming the intrinsic gas.
The call
(not this call)
The DAI smart contract is stored at address 0x6b175474e89094c44da98b954eedeac495271d0f. That's the address we set in the to field of the transaction. This initial call is meant for the EVM to execute whatever code is stored at it. Opcode by opcode.
Opcodes are EVM instructions represented with hex numbers ranging from 00 to FF. Though they're usually referred to with their names. For example, 00 is STOP and FF is SELFDESTRUCT. A handy list of opcodes is available at evm.codes.
So what are DAI's opcodes anyway ? Glad you asked:
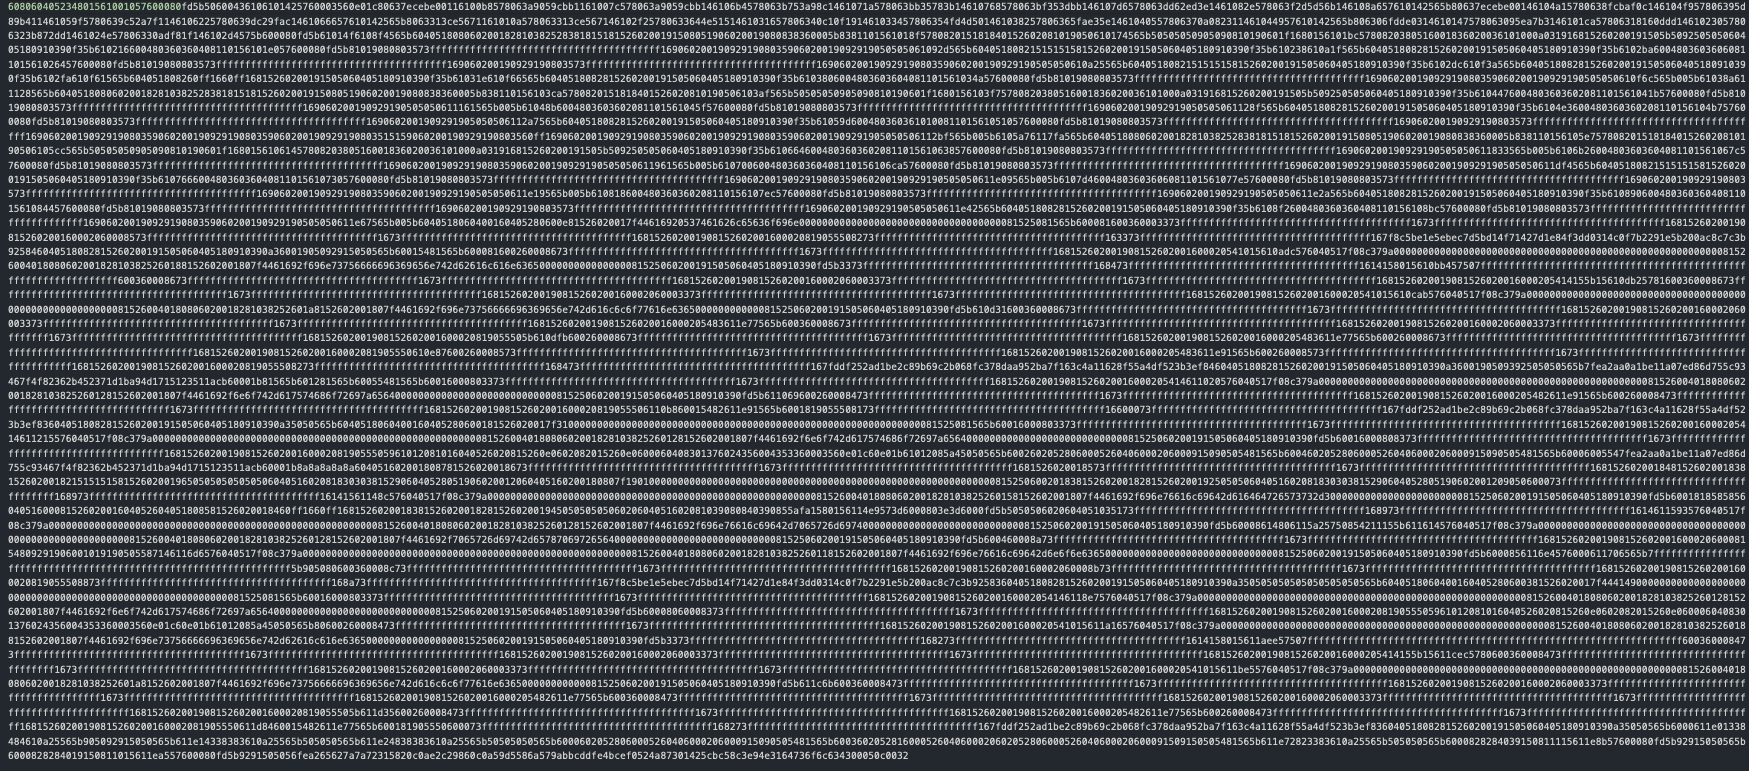
Don't panic. It's still early to make sense out of all of that.
Let's start slowly, tearing the initial call apart. Its brief docs provide a good summary:
// Call executes the contract associated with the addr with the given input as
// parameters. It also handles any necessary value transfer required and takes
// the necessary steps to create accounts and reverses the state in case of an
// execution error or failed value transfer.
func (evm *EVM) Call(caller ContractRef, addr common.Address, input []byte, gas uint64, value *big.Int) (ret []byte, leftOverGas uint64, err error) {
    ...
}
To begin with, the logic checks that the call depth limit hasn't been reached. This limit is set to 1024, which means there can only be a maximum of 1024 nested calls in a single transaction. Here is an interesting article to read about some of the reasoning and subtleties behind this behavior of the EVM. Later we'll explore how the call depth is increased/decreased.
Relevant side note: the call depth limit is not the EVM's stack size limit - which (coincidentally?) is 1024 elements as well.
The next step is to make sure that if a positive value was specified in the call, the sender has enough balance to execute the transfer (performed a few steps later). We can ignore this because our call has zero value. Additionally, a snapshot of the current state is taken. This allows easily reverting any state changes upon failure.
We know that DAI's address refers to an account that has code. Thus, it must already exist in Ethereum's state.
However, let's imagine for a moment this was not a transaction to send 1 DAI. Say it was a trivial transaction with no value targetting a new address. The corresponding account would need to be added to the state. However, what if said account would end up being just empty ? There doesn't seem to be a reason to keep track of it - other than wasting nodes' disk space. EIP 158 introduced some changes to the Ethereum protocol to help avoid such scenarios. That's why you're seeing this if clause when calling any account.
Another thing we know is that DAI is not a precompile contract. What's a precompiled contract ? Here's what the Ethereum yellow paper has to offer:
[...] preliminary piece of architecture that may later become native extensions. The contracts in addresses 1 to 9 execute the elliptic curve public key recovery function, the SHA2 256-bit hash scheme, the RIPEMD 160-bit hash scheme, the identity function, arbitrary precision modular exponentiation, elliptic curve addition, elliptic curve scalar multiplication, an elliptic curve pairing check, and the BLAKE2 compression function F respectively.
In short, there're (so far) 9 different special contracts in Ethereum's state. These accounts (ranging from 0x0000000000000000000000000000000000000001 to 0x0000000000000000000000000000000000000009) out-of-the-box include the necessary code to execute the operations mentioned in the yellow paper. Of course, you can check this by yourself in Geth's code.
To add some color to the story of precompiled contracts, note that in Ethereum mainnet all these accounts have at least 1 wei in balance. This was done intentionally (at least before users started sending Ether by mistake). Look, here's an almost 5-year-old transaction sending 1 wei to the 0x0000000000000000000000000000000000000009 precompile.
Anyway. Having realized the call's target address does not correspond to a precompiled contract, the node reads the account's code from the state. Then ensures it's non-empty. At last, orders the EVM to use its interpreter to run the code with the given input (the contents of the transaction's data field).
The interpreter (part 1)
It's time for the EVM to actually execute DAI's code. To accomplish this, the EVM has a couple of elements at hand. It has a stack that can hold up to 1024 elements (though only the first 16 are directly accessible with the available opcodes). It has a volatile read/write memory space. It has a program counter. It has a special read-only memory space called calldata where the call's input data is kept. Among other stuff.
As usual, there's some necessary setup and validations before jumping into the juicy stuff. First, the call depth is incremented by one. Second, the read-only mode is set if necessary. Ours is not a read-only call (see the false argument passed here). Otherwise some EVM operations wouldn't be allowed. These include state-changing EVM instructions SSTORE, CREATE, CREATE2, SELFDESTRUCT, CALL with positive value, and LOG.
The interpreter now enters the execution loop. It consists of sequentially executing the opcodes in DAI's code as indicated by the program counter and the current EVM instruction set. For the time being we're using the London instruction set - which was configured in the jump table when the interpreter was first instantiated.
The loop also takes care of keeping a healthy stack (avoiding under/overflows). And spending each operation's fixed gas costs, as well as dynamic gas costs when appropriate. These dynamic costs include, for example, the expansion of EVM memory (read more about memory expansion costs are calculated here). Note that gas is consumed before execution of an opcode - not after.
The actual behavior of each possible instruction can be found implemented in this Geth file. By just skimming through it one can begin to see how these instructions work with the stack, the memory, the calldata and the state.
At this point we'd need to jump straight into DAI's opcodes and follow their execution for our transaction. Yet I don't think that's the best way to approach this. I'd rather first walk away from the EVM and Geth, and move into Solidity lands. This should give us a more valuable overview of the high-level behavior of an ERC20 transfer operation.
Solidity execution
The DAI smart contract was coded in Solidity. It is an object-oriented, high-level language that when compiled, outputs EVM bytecode able to deploy smart contracts on an EVM-compatible chain (Ethereum in our case).
DAI's source code can be found verified in block explorers, or in GitHub. For ease of reference, I'll be pointing to the first.
Before we begin, let's always keep in mind that the EVM knows nothing about Solidity. It knows nothing about its variables, functions, the layout of contracts, ABI-encoding, etc. The Ethereum blockchain stores plain hard EVM bytecode, not fancy Solidity code.
You might wonder then how come when you go to any block explorer, they show you Solidity code at Ethereum addresses. Well, it's just a façade. In most block explorers people can upload Solidity source code, and the explorer takes care of compiling the source with specific compiler settings. If the compiler's output produced by the explorer matches what's stored at the specified address on the blockchain, then the contract's source code is said to be "verified". From then on, anyone that navigates to that address sees the Solidity code of that address, instead of only the EVM bytecode stored at it.
A non-trivial consequence of the above is that to some extent we're trusting block explorers to show us the legitimate code (which might not necessarily be true, even if accidentally). There are might be alternatives to this though - unless every time you want to read a contract you verify source code against your own node.
Anyway, back to DAI's Solidity code now.
On the DAI smart contract (compiled with Solidity v0.5.12), let's focus on the function to execute: transfer.
function transfer(address dst, uint wad) external returns (bool) {
    return transferFrom(msg.sender, dst, wad);
}
When transfer is run, it will call another function named transferFrom, then returning whatever boolean flag the latter returns. The first and second argument of transfer (here named dst and wad) are passed directly to transferFrom. This function additionally reads the sender's address (available as a Solidity global variable in msg.sender).
For our case, these would be the values passed to transferFrom:
return transferFrom(
    msg.sender, // 0x6fC27A75d76d8563840691DDE7a947d7f3F179ba (my address on the local testing node)
    dst,        // 0xd8dA6BF26964aF9D7eEd9e03E53415D37aA96045 (Vitalik's address)
    wad         // 1000000000000000000 (1 DAI in wei units)
);
Let's see the transferFrom function then.
function transferFrom(address src, address dst, uint wad) public returns (bool) {
   ...
}
First, the sender's balance is checked against the amount being transferred.
require(balanceOf[src] >= wad, "Dai/insufficient-balance");
It's simple: you cannot transfer more DAI than what you have in balance. If I didn't have 1 DAI, execution would halt at this point, returning an error with a message. Note that each address' balance is tracked on the smart contract storage. In a map-like data structure named balanceOf. If you have at least 1 DAI, I can assure you your account's address has a record somewhere in there.
Second, token allowances are validated.
// don't bother too much about this :)
if (src != msg.sender && allowance[src][msg.sender] != uint(-1)) {
    require(allowance[src][msg.sender] >= wad, "Dai/insufficient-allowance");
    allowance[src][msg.sender] = sub(allowance[src][msg.sender], wad);
}
This does not concern us right now. Because we're not executing the transfer on behalf of another account. Though do note that's a mechanism all ERC20 tokens should implement - DAI not being the exception. In essence, you can approve other accounts to transfer DAI tokens from your account.
Third, the actual balance swap happens.
balanceOf[src] = sub(balanceOf[src], wad);
balanceOf[dst] = add(balanceOf[dst], wad);
When sending 1 DAI, the sender's balance is decreased by 1000000000000000000, and the receiver's balance is incremented by 1000000000000000000. These operations are done reading and writing on the balanceOf data structure. It's worth noting the use of two special functions add and sub to do the math.
Why not simply use the + and - operators ?
Remember: this contract was compiled with Solidity 0.5.12. At that point in time the compiler did not include over/underflow checks as it does today. Thus developers had to remember (or be reminded 😛) to implement them by themselves where appropriate. Thus the use of add and sub in the DAI contract. They are just custom internal functions to perform addition and subtraction with bound checks to avoid arithmetic issues.
function add(uint x, uint y) internal pure returns (uint z) {
    require((z = x + y) >= x);
}

function sub(uint x, uint y) internal pure returns (uint z) {
    require((z = x - y) <= x);
}
The add function sums x and y, halting execution if the result of the operation is lower than x (thus preventing integer overflow).
The sub function subtracts y from x, halting execution if the result of the operation is greater than x (thus preventing integer underflow).
Fourth, a Transfer event is emitted (as suggested by the ERC20 spec).
emit Transfer(src, dst, wad);
An event is a logging operation. Data emitted in an event can later be retrieved from off-chain services reading the blockchain, though never by other contracts.
In our transfer operation the emitted event appears to log three elements. The sender's address (0x6fC27A75d76d8563840691DDE7a947d7f3F179ba), the receiver's address (0xd8dA6BF26964aF9D7eEd9e03E53415D37aA96045), and the amount sent (1000000000000000000).
The first two correspond to the parameters labeled as indexed in the event's declaration. Indexed parameters facilitate data retrieval, allowing filtering for any of the corresponding logged values. Unless the event is labeled as anonymous, the event identifier is also included as a topic.
Hence, being more specific, the Transfer event we're dealing with actually logs 3 topics (the event's identifier, the sender's address and the receiver's address) and 1 value (the amount of DAI transferred). We'll cover more details about this event once we get to lower-level EVM stuff.
At the end of the function, the boolean value true is returned (as suggested by the ERC20 spec).
return true;
That's a way of signaling that the transfer was successfully executed. This boolean flag is passed up to the outer transfer function that initiated the call (which simply returns it as well).
And that's it! If you've ever sent DAI, be certain that's the logic you've executed. That's the job you've paid to be done for you by a global decentralized network of nodes.
Hold on. I may have gone too far. That's kind of a lie. Because as I told you earlier, the EVM knows nothing about Solidity. Nodes execute no Solidity. They execute EVM bytecode.
It's time for the real deal.
EVM execution
I'm turning quite technical in this section. I'll assume you're somewhat familiar with looking at some EVM bytecode. If you're not, I highly recommend reading this series or this newer one. There you will find lots of the concepts in this section explained individually and in more depth.
DAI's raw bytecode is tough to look at - we already witnessed it in a previous section. A prettier way to study it is using a disassembled version. You can find Dai's disassembled bytecode here (I've extracted it to this gist for ease of reference).
Free memory pointer and call's value
The first three instructions shouldn't come as a surprise if you're already familiar with the Solidity compiler. It's simply initializing the free memory pointer.
0x0: PUSH1     0x80
0x2: PUSH1     0x40
0x4: MSTORE
The Solidity compiler reserves memory slots from 0x00 to 0x80 for internal stuff. So the "free memory pointer" is a pointer to the first slot of EVM memory that can be freely used. It is stored at 0x40, and at initialization points to 0x80.
Keep in mind that all EVM opcodes have a counterpart implementation in Geth. For example, you can really see how the implementation of MSTORE pops two stack elements and writes to the EVM memory a word of 32 bytes:
func opMstore(pc *uint64, interpreter *EVMInterpreter, scope *ScopeContext) ([]byte, error) {
    // pop value of the stack
    mStart, val := scope.Stack.pop(), scope.Stack.pop()
    scope.Memory.Set32(mStart.Uint64(), &val)
    return nil, nil
}
The next EVM instructions in DAI's bytecode ensure that the call doesn't hold any value. If it had, execution would halt at the REVERT instruction. Note the use of the CALLVALUE instruction (implemented here) to read the current call's value.
0x5: CALLVALUE
0x6: DUP1
0x7: ISZERO
0x8: PUSH2     0x10
0xb: JUMPI
0xc: PUSH1     0x0
0xe: DUP1
0xf: REVERT
Our call doesn't hold any value (the value field of the transaction was set to zero) - so we're good to continue.
Validating calldata (part 1)
Next: another check introduced by the compiler. This time it's figuring out whether the calldata's size (obtained with the CALLDATASIZE instruction - implemented here) is lower than 4 bytes (see the 0x4 and the LT instruction below ?). In such case it would jump to position 0x142. Halting execution at the REVERT instruction in position 0x146.
0x10: JUMPDEST
0x11: POP
0x12: PUSH1     0x4
0x14: CALLDATASIZE
0x15: LT
0x16: PUSH2     0x142
0x19: JUMPI

...

0x142: JUMPDEST
0x143: PUSH1     0x0
0x145: DUP1
0x146: REVERT
That means that in the DAI smart contract calldata's size is enforced to be at least 4 bytes. That's because the ABI-encoding mechanism used by Solidity identifies functions with the first four bytes of the keccak256 hash of their signature (usually called "function selector" - see the spec).
If calldata didn't have at least 4 bytes, it wouldn't be possible to identify the function. So the compiler introduces the necessary EVM instructions to fail early in that scenario. That's what you witnessed above.
In order to call the transfer(address,uint256) function, the first four bytes of the calldata must match the function's selector. These are:
$ cast sig "transfer(address,uint256)"
0xa9059cbb
That's right. Exactly the same first 4 bytes of the data field of the transaction we built earlier:
0xa9059cbb000000000000000000000000d8da6bf26964af9d7eed9e03e53415d37aa960450000000000000000000000000000000000000000000000000de0b6b3a7640000
Now that the length of the calldata has been validated, it's time to use it. See below how the first four bytes calldata are placed at the top of the stack (main EVM instruction to notice here is CALLDATALOAD, implemented here).
0x1a: PUSH1     0x0
0x1c: CALLDATALOAD
0x1d: PUSH1     0xe0
0x1f: SHR
In reality CALLDATALOAD pushes 32 bytes of calldata to the stack. It needs to be chopped with the SHR instruction to keep the first 4 bytes.
Function dispatcher
Don't try to understand the following line by line. Instead, pay attention to the high-level pattern that stands out. I'll add some dividing lines to make it clearer:
0x20: DUP1
0x21: PUSH4     0x7ecebe00
0x26: GT
0x27: PUSH2     0xb8
0x2a: JUMPI
0x2b: DUP1
0x2c: PUSH4     0xa9059cbb
0x31: GT
0x32: PUSH2     0x7c
0x35: JUMPI
0x36: DUP1
0x37: PUSH4     0xa9059cbb
0x3c: EQ
0x3d: PUSH2     0x6b4
0x40: JUMPI
0x41: DUP1
0x42: PUSH4     0xb753a98c
0x47: EQ
0x48: PUSH2     0x71a
0x4b: JUMPI
It's no coincidence that some of the hex values being pushed to the stack are 4 bytes long. Those are, indeed, function selectors.
The set of instructions above is a common structure of the bytecode that the Solidity compiler produces. It's usually referred to as "function dispatcher". It resembles an if-else or switch flow. It's simply trying to match the first four bytes of the calldata against the set of known selectors of the contract's functions. Once it finds a coincidence, execution will jump to another section of the bytecode. Where the instructions for that particular function are placed.
Following the above logic, the EVM matches the first four bytes of calldata against the selector of the ERC20 transfer function: 0xa9059cbb. And jumps to bytecode position 0x6b4. That's how the EVM is told to start executing the transfer of DAI.
Validating calldata (part 2)
Having matched the selector and jumped, now the EVM is about to start running specific code related to the function. But before jumping into its details, it needs to somehow remember where to continue executing once all function-related logic has been executed.
The way to do that is simply keeping the appropriate bytecode position in the stack. See the 0x700 value being pushed below. It will linger in stack until at some point (later down the road) it will be retrieved and be used to jump back to wrap up execution.
0x6b4: JUMPDEST
0x6b5: PUSH2     0x700
Now let's get more specific to the transfer function.
The compiler embeds some logic to ensure the calldata's size is correct for a function with two parameters of address and uint256 type. For the transfer function, that is at least 68 bytes (4 bytes for the selector + 64 bytes for the two ABI-encoded parameters).
0x6b8: PUSH1     0x4
0x6ba: DUP1
0x6bb: CALLDATASIZE
0x6bc: SUB
0x6bd: PUSH1     0x40
0x6bf: DUP2
0x6c0: LT
0x6c1: ISZERO
0x6c2: PUSH2     0x6ca
0x6c5: JUMPI
0x6c6: PUSH1     0x0
0x6c8: DUP1
0x6c9: REVERT
If the calldata's size was lower, execution would halt at the REVERT in position 0x6c9. Since our transaction's calldata has been correctly ABI-encoded and therefore has the appropriate length, execution jumps to position 0x6ca.
Reading parameters
Next step is for the EVM to read the two parameters provided in the calldata. Those would be the 20-bytes-long address 0xd8dA6BF26964aF9D7eEd9e03E53415D37aA96045 and the number 1000000000000000000 (0x0de0b6b3a7640000 in hex). Both were ABI-encoded in chunks of 32 bytes. Thus there needs to be some basic manipulation to read the right values and place them at the top of the stack.
0x6ca: JUMPDEST
0x6cb: DUP2
0x6cc: ADD
0x6cd: SWAP1
0x6ce: DUP1
0x6cf: DUP1
0x6d0: CALLDATALOAD
0x6d1: PUSH20    0xffffffffffffffffffffffffffffffffffffffff
0x6e6: AND
0x6e7: SWAP1
0x6e8: PUSH1     0x20
0x6ea: ADD
0x6eb: SWAP1
0x6ec: SWAP3
0x6ed: SWAP2
0x6ee: SWAP1
0x6ef: DUP1
0x6f0: CALLDATALOAD
0x6f1: SWAP1
0x6f2: PUSH1     0x20
0x6f4: ADD
0x6f5: SWAP1
0x6f6: SWAP3
0x6f7: SWAP2
0x6f8: SWAP1
0x6f9: POP
0x6fa: POP
0x6fb: POP
0x6fc: PUSH2     0x1df4
0x6ff: JUMP
Just to make it more visual, after sequentially applying the above set of instructions (up to 0x6fb), the top of stack looks like this:
0x0000000000000000000000000000000000000000000000000de0b6b3a7640000
0x000000000000000000000000d8da6bf26964af9d7eed9e03e53415d37aa96045
And that's how the EVM swiftly extracts both arguments from calldata, placing them on the stack for future use.
The final two instructions above (bytecode positions 0x6fc and 0x6ff) simply make execution jump to position 0x1df4. Let's continue there.
The transfer function
During the brief Solidity analysis, we saw that the transfer(address,uint256) function was a thin wrapper that called the more complex transferFrom(address,address,uint256) function. The compiler translates such internal call to these EVM instructions:
0x1df4: JUMPDEST
0x1df5: PUSH1     0x0
0x1df7: PUSH2     0x1e01
0x1dfa: CALLER
0x1dfb: DUP5
0x1dfc: DUP5
0x1dfd: PUSH2     0xa25
0x1e00: JUMP
First notice the instruction pushing the value 0x1e01. That's how the EVM is instructed to "remember" the exact position where it should jump back to continue execution after the upcoming internal call.
Then, pay attention to the use of CALLER (because in Solidity the internal call uses msg.sender). As well as to the two DUP5 instructions. Together, these are putting at the top of the stack the three necessary arguments for transferFrom: the caller's address, the receiver's address, and the amount to be transferred. The last two were already somewhere in the stack, thus the use of DUP5. The top of the stack now holds all necessary arguments:
0x0000000000000000000000000000000000000000000000000de0b6b3a7640000
0x000000000000000000000000d8da6bf26964af9d7eed9e03e53415d37aa96045
0x0000000000000000000000006fc27a75d76d8563840691dde7a947d7f3f179ba
Finally, following instructions 0x1dfd and 0x1e00, execution jumps to position 0xa25. Where the EVM will start executing the instructions corresponding to the transferFrom function.
The transferFrom function
First thing that needs to be checked is whether the sender has enough DAI in balance - otherwise reverting. The sender's balance is kept in the contract storage. The fundamental EVM instruction needed is then SLOAD. However, SLOAD needs to know what storage slot needs to be read. For mappings (the type of Solidity data structure that is holding account balances in the DAI smart contract), that's not so straightforward to tell.
I won't dive here into the internal layout of Solidity state variables in contract storage. You may read about it here for v0.5.15. Suffice to say that given the key address k for the mapping balanceOf, its corresponding uint256 value will be kept at storage slot keccak256(k . p), where p is the slot position of the mapping itself and . is concatenation. You can do the math yourself.
For simplicity, let's just highlight a couple of operations that need to happen. The EVM must i) calculate the storage slot for the mapping, ii) read the value, iii) compare it against the amount to be transferred (a value already in stack). Therefore we should see instructions like SHA3 for the hashing, SLOAD for reading storage, and LT for the comparison.
0xa25: JUMPDEST
0xa26: PUSH1     0x0
0xa28: DUP2
0xa29: PUSH1     0x2
0xa2b: PUSH1     0x0
0xa2d: DUP7
0xa2e: PUSH20    0xffffffffffffffffffffffffffffffffffffffff
0xa43: AND
0xa44: PUSH20    0xffffffffffffffffffffffffffffffffffffffff
0xa59: AND
0xa5a: DUP2
0xa5b: MSTORE
0xa5c: PUSH1     0x20
0xa5e: ADD
0xa5f: SWAP1
0xa60: DUP2
0xa61: MSTORE
0xa62: PUSH1     0x20
0xa64: ADD
0xa65: PUSH1     0x0
0xa67: SHA3      --> calculating storage slot
0xa68: SLOAD     --> reading storage
0xa69: LT        --> comparing balance against amount
0xa6a: ISZERO
0xa6b: PUSH2     0xadc
0xa6e: JUMPI
If the sender didn't have enough DAI, execution would follow at 0xa6f and finally hit the REVERT at 0xadb. Since I did not forget to load 1 DAI in my sender account's balance, let's then proceed to position 0xadc.
The following set of instructions correspond to the EVM validating whether the caller matches the sender's address (remember the if (src != msg.sender ...) { ... } code segment in the contract).
0xadc: JUMPDEST
0xadd: CALLER
0xade: PUSH20    0xffffffffffffffffffffffffffffffffffffffff
0xaf3: AND
0xaf4: DUP5
0xaf5: PUSH20    0xffffffffffffffffffffffffffffffffffffffff
0xb0a: AND
0xb0b: EQ
0xb0c: ISZERO
0xb0d: DUP1
0xb0e: ISZERO
0xb0f: PUSH2     0xbb4
0xb12: JUMPI
...
0xbb4: JUMPDEST
0xbb5: ISZERO
0xbb6: PUSH2     0xdb2
0xbb9: JUMPI
Since they don't match, continue executing at position 0xdb2.
Doesn't this code below remind you of something ? Check out the instructions being used. Again, don't focus on them individually. Use your intuition to spot high-level patterns and the most relevant instructions.
0xdb2: JUMPDEST
0xdb3: PUSH2     0xdfb
0xdb6: PUSH1     0x2
0xdb8: PUSH1     0x0
0xdba: DUP7
0xdbb: PUSH20    0xffffffffffffffffffffffffffffffffffffffff
0xdd0: AND
0xdd1: PUSH20    0xffffffffffffffffffffffffffffffffffffffff
0xde6: AND
0xde7: DUP2
0xde8: MSTORE
0xde9: PUSH1     0x20
0xdeb: ADD
0xdec: SWAP1
0xded: DUP2
0xdee: MSTORE
0xdef: PUSH1     0x20
0xdf1: ADD
0xdf2: PUSH1     0x0
0xdf4: SHA3
0xdf5: SLOAD
0xdf6: DUP4
0xdf7: PUSH2     0x1e77
0xdfa: JUMP
If it resembles reading a mapping from storage, it's because it is! The above is the EVM reading the sender's balance from the balanceOf mapping.
Execution then jumps to position 0x1e77, where the body of the sub function is placed.
The sub function subtracts two numbers, reverting upon integer underflow. I'm not including the bytecode, though you can follow it here. The result of the arithmetic operation is kept on the stack.
Back to the instructions corresponding to transferFrom function's body, now the result of the subtraction is to be written to storage - updating the balanceOf mapping. Try to notice below the calculation performed to obtain the appropriate storage slot of the mapping entry, which leads to the execution of the SSTORE instruction. This instruction is the one that effectively writes data to state - that is, that updates the contract's storage.
0xdfb: JUMPDEST
0xdfc: PUSH1     0x2
0xdfe: PUSH1     0x0
0xe00: DUP7
0xe01: PUSH20    0xffffffffffffffffffffffffffffffffffffffff
0xe16: AND
0xe17: PUSH20    0xffffffffffffffffffffffffffffffffffffffff
0xe2c: AND
0xe2d: DUP2
0xe2e: MSTORE
0xe2f: PUSH1     0x20
0xe31: ADD
0xe32: SWAP1
0xe33: DUP2
0xe34: MSTORE
0xe35: PUSH1     0x20
0xe37: ADD
0xe38: PUSH1     0x0
0xe3a: SHA3
0xe3b: DUP2
0xe3c: SWAP1
0xe3d: SSTORE
A pretty similar set of opcodes is run to update the receiver's account balance. First is read from the balanceOf mapping in storage. Then the balance is added to the amount being transferred using the add function. At last the result is written to the appropriate storage slot.
Logging
In the contract's code the Transfer event was emitted after updating balances. So there has to be a set of instructions in the bytecode under analysis that take care of emitting such event with the appropriate data.
However, events are yet another thing that belong to Solidity's fantasy world. In EVM world, events correspond to logging operations.
Logging is performed with the available set of LOG instructions. There are a couple of variants, depending on how many topics are to be logged. In DAI's case, we already noted that the emitted Transfer event has 3 topics.
Then it's no surprise to find a set of instructions that lead to running the LOG3 instruction.
0xeca: POP
0xecb: DUP3
0xecc: PUSH20    0xffffffffffffffffffffffffffffffffffffffff
0xee1: AND
0xee2: DUP5
0xee3: PUSH20    0xffffffffffffffffffffffffffffffffffffffff
0xef8: AND
0xef9: PUSH32    0xddf252ad1be2c89b69c2b068fc378daa952ba7f163c4a11628f55a4df523b3ef
0xf1a: DUP5
0xf1b: PUSH1     0x40
0xf1d: MLOAD
0xf1e: DUP1
0xf1f: DUP3
0xf20: DUP2
0xf21: MSTORE
0xf22: PUSH1     0x20
0xf24: ADD
0xf25: SWAP2
0xf26: POP
0xf27: POP
0xf28: PUSH1     0x40
0xf2a: MLOAD
0xf2b: DUP1
0xf2c: SWAP2
0xf2d: SUB
0xf2e: SWAP1
0xf2f: LOG3
There's at least one value that stands out in those instructions: 0xddf252ad1be2c89b69c2b068fc378daa952ba7f163c4a11628f55a4df523b3ef. That's the event's main identifier. Also called topic 0. It is a static value calculated by the compiler at compiling time (embedded in the contract's runtime bytecode). As noted previously, no more than the hash of the event's signature:
$ cast keccak "Transfer(address,address,uint256)"
0xddf252ad1be2c89b69c2b068fc378daa952ba7f163c4a11628f55a4df523b3ef
Right before reaching the LOG3 instruction, the stack looks like this:
0x0000000000000000000000000000000000000000000000000000000000000080
0x0000000000000000000000000000000000000000000000000000000000000020
0xddf252ad1be2c89b69c2b068fc378daa952ba7f163c4a11628f55a4df523b3ef -- topic 0 (event identifier)
0x0000000000000000000000006fc27a75d76d8563840691dde7a947d7f3F179ba -- topic 1 (sender's address)
0x000000000000000000000000d8da6bf26964af9d7eed9e03e53415d37aa96045 -- topic 2 (receiver's address)
Where's the amount of the transfer then ? In memory! Before reaching LOG3, the EVM was first instructed to store the amount in memory. So that it can later be consumed by the logging instruction. If you look at position 0xf21, you'll see the MSTORE instruction in charge of doing so.
So once LOG3 is reached, it is safe for the EVM to grab the actual value logged from memory, starting at offset 0x80 and reading 0x20 bytes (first two stack elements above).
Another way of understanding logging is looking at its implementation in Geth. In there you'll find a single function in charge of handling all logging instructions. You can see how i) an empty array of topics is initialized, ii) the memory offset and data size are read from the stack, iii) the topics are read from stack and inserted in the array, iv) the value is read from memory, v) the log, containing address where it was emitted, topics and value, is appended.
How those logs are later recovered, we'll find out soon enough.
Returning
Last thing for the transferFrom function is to return the boolean value true. That's why the first instruction after LOG3 is simply pushing the 0x1 value to the stack.
0xf30: PUSH1 0x1
The next instructions prepare the stack to exit the transferFrom function, going back to its wrapper transfer function. Remember that the position for this next jump had been already stored in the stack - that's why you don't see it in the opcodes below.
0xf32: SWAP1
0xf33: POP
0xf34: SWAP4
0xf35: SWAP3
0xf36: POP
0xf37: POP
0xf38: POP
0xf39: JUMP
Back in the transfer function, all there's to do is to prepare the stack for the final jump. To a position where execution will be wrapped up. The position for this upcoming jump had also been stored in the stack previously (remember the 0x700 value being pushed?).
0x1e01: JUMPDEST
0x1e02: SWAP1
0x1e03: POP
0x1e04: SWAP3
0x1e05: SWAP2
0x1e06: POP
0x1e07: POP
0x1e08: JUMP
All that's left is to prepare the stack for the final instruction: RETURN. This instruction is in charge of reading some data from memory, and passing it back to the original caller.
For the DAI transfer, the returned data would simply include the true boolean flag returned by the transfer function. Remember that the value had been already placed at the stack.
The EVM begins with grabbing the first available position of free memory. This is done by reading the free memory pointer:
0x700: JUMPDEST
0x701: PUSH1     0x40
0x703: MLOAD
Next, the value must be stored in memory with MSTORE. Although not so straightforward to tell, the instructions below are just the ones the compiler found most appropriate to prepare the stack for the MSTORE operation.
0x704: DUP1
0x705: DUP3
0x706: ISZERO
0x707: ISZERO
0x708: ISZERO
0x709: ISZERO
0x70a: DUP2
0x70b: MSTORE
The RETURN instruction copies the returned data from memory. So it needs to be told how much memory to read, and where to start. The instructions below simply tell the EVM to read and return 0x20 bytes from memory starting at the free memory pointer.
0x70c: PUSH1     0x20
0x70e: ADD
0x70f: SWAP2
0x710: POP
0x711: POP
0x712: PUSH1     0x40
0x714: MLOAD
0x715: DUP1
0x716: SWAP2
0x717: SUB
0x718: SWAP1
0x719: RETURN
The value 0x0000000000000000000000000000000000000000000000000000000000000001 (corresponding to the boolean true) is returned.
Execution halts.
The interpreter (part 2)
Bytecode execution has finished. The interpreter must stop iterating. In Geth, that's done like this:
// interpreter's execution loop
for {
    ...
    // execute the operation
    res, err = operation.execute(&pc, in, callContext)
    if err != nil {
        break
    }
    ...
}
That means that the implementation of the RETURN opcode should somehow return an error. Even for successful executions such as ours. Indeed, it does. Though it acts as a flag - the error is actually deleted when it matches the flag returned by the successful execution of the RETURN opcode.
Gas refunds and payments
With the interpreter run finished, we're back in the call that originally triggered it. The run was completed successfully. Thus the returned data and any gas remaining is simply returned.
The call's finished as well. Execution follows wrapping up the state transition.
First providing gas refunds. These are added to any gas leftovers in the transaction. The refunded amount is capped to 1/5 of the gas used (due to EIP 3529). All gas available now (remaining plus refunded) is paid back in ETH to the sender's account, at the rate originally set by the sender in the transaction. All gas left is re-added to the available gas in the block - so that subsequent transactions can consume it.
Then paying the coinbase address (the miner's address in PoW, the validator's address in PoS) what was originally promised: the tip. Interestingly, payment is done for all gas used during execution. Even if some of it was later refunded. Moreover, note here how the effective tip is calculated. Not only noticing that it is capped by the maxPriorityFeePerGas transaction field. But more importantly, realizing that it does not include the base fee! That's no mistake - Ethereum enjoys watching the ETH burn.
At last the execution result is wrapped in a prettier structure. Including the used gas, any EVM error that could have aborted execution (none in our case), along with the returned data from the EVM.
Building the transaction receipt
The structure representing the execution result is now passed back up. At this point Geth does some internal cleanup of the execution state. Once done, it accumulates the gas used in the transaction (including refunds).
Most importantly, now is the time the transaction receipt is created. The receipt's an object summarizing data related to the transaction's execution. It includes information such as execution status (success/failure), the transaction's hash, gas units used, address of created contract (none in our case), logs emitted, the transaction's bloom filter, and more.
We'll retrieve the full contents of our transaction's receipt soon.
If you'd like to dig deeper into the transaction's logs and the role of the bloom filter, check out noxx's article.
Sealing the block
Execution of subsequent transactions continue happening until the block runs out of space.
That's when the node invokes the consensus engine to finalize the block. In PoW that entails accumulating mining rewards (issuing full rewards in ETH to the coinbase address, along with partial rewards for ommer blocks) and updating the final state root of the block accordingly.
Next, the actual block is assembled, putting all data in its right place. Including information such as the header's transaction hash, or the receipts hash.
All ready for the real PoW mining now. A new "task" is created and pushed to the right listener. The sealing task, delegated to the consensus engine, starts.
I won't explain in detail how the actual mining is done for PoW. Lots about it on the Internet already. Just note that in Geth this involves a multithreaded try-and-error process to find a number that satisfies a necessary condition. Needless to say, once Ethereum switches to Proof of Stake the sealing process will be handled quite differently.
The mined block is pushed to the appropriate channel and received at the results loop. Where receipts and logs are updated accordingly with the latest block data after its been effectively mined.
The block is finally written to the chain, placing it at its head.
Broadcasting the block
Next step is to announce to the whole network that a new block has been mined. Meanwhile the block is internally stored into the set of pending ones. Patiently awaiting for confirmations from other nodes.
The announcement is done posting a specific event, picked up by the mined broadcast loop. In there the block is fully propagated to a subset of peers and made available to the rest in a lighter fashion.
More specifically, propagation entails sending block data to the square root of connected peers. Internally this is implemented pushing the data to the queued blocks channel, until its sent via the p2p layer. The p2p message is identified as NewBlockMsg. The rest receives a lightweight announcement including the block hash.
Note that this is only valid for PoW. Block propagation will happen on consensus engines in Proof of Stake.
Verifying the block
Peers are continuously listening for messages. Each type of possible message has an associated handler that is invoked as soon as the corresponding message is received.
Consequently, upon getting the NewBlockMsg message with the block's data, its corresponding handler is executed. The handler decodes the message and runs some early validations on the propagated block. These include preliminary sanity checks on the header's data, mostly ensuring they are filled and bounded. As well as validations for the block's uncle and transaction hashes.
Then the peer that sent the message is marked as owning the block. Thus avoiding to later propagate the block back to it.
At last, the packet is passed down to a second handler, where the block is going to be enqueued for import into the local copy of the chain. The enqueuing is done by sending a direct import request to the corresponding channel. When the request is picked up, it triggers the actual enqueuing operation. Finally pushing the block data to the queue.
The block is now in the local queue ready to be processed. This queue is read from periodically in the node's block fetcher main loop. When the block makes it to the front, the node will pick it up and attempt to import it.
There are a at least two validations worth highlighting prior to the actual insertion of the candidate block.
First, the local chain must already include the parent of the propagated block.
Second, the block's header must be valid. These validations are the real ones. Meaning, the ones that actually matter for consensus, and are specified in Ethereum's yellow paper. Hence, they are handled by the consensus engine.
Just as examples, the engine checks that the block's proof of work is valid, or that the block's timestamp is not in the past nor not too far ahead into the future, or that the block's number has been increased correctly. Among others.
Having verified that its header follows consensus rules, the whole block is further propagated to a subset of peers. Only then the actual import is run.
There's a lot happening during an import. So I'll cut right to the chase.
After several additional validations, the parent's block state is retrieved. This is the state on top of which the first transaction of the new block is going to be executed. Using it as a reference point, the entire block is processed. If you've ever heard that all Ethereum nodes are expected to execute and validate every single transaction, now you can be certain of it. Afterwards, the post-state is validated (see how here). Finally, the block is written to the local chain.
The successful import leads to announcing (not fully broadcasting) the block to the rest of the node's peers.
The whole verification process is replicated across all nodes that receive the block. A good portion will accept it into their local chains, and later newer blocks will arrive to insert on top of it.
Retrieving the transaction
After a few blocks have been mined on top of the one where the transaction was included, one can start to safely assume that the transaction has been indeed confirmed.
Retrieving the transaction from the chain is quite simple. All we need is its hash. Conveniently, it was obtained as soon as we first submitted the transaction.
The data of the transaction itself, plus the block's hash and number, can always be retrieved at the node's eth_getTransactionByHash endpoint. Unsurprisingly, it now returns:
{
    "hash": "0xbf77c4a9590389b0189494aeb2b2d68dc5926a5e20430fb5bc3c610b59db3fb5",
    "type": 2,
    "accessList": [],
    "blockHash": "0xe880ba015faa9aeead0c41e26c6a62ba4363822ddebde6dd77a759a753ad2db2",
    "blockNumber": 15166167,
    "transactionIndex": 0,
    "confirmations": 6,
    "from": "0x6fC27A75d76d8563840691DDE7a947d7f3F179ba",
    "maxPriorityFeePerGas": 2000000000,
    "maxFeePerGas": 120000000000,
    "gasLimit": 40000,
    "to": "0x6B175474E89094C44Da98b954EedeAC495271d0F",
    "value": 0,
    "nonce": 0,
    "data": "0xa9059cbb000000000000000000000000d8da6bf26964af9d7eed9e03e53415d37aa960450000000000000000000000000000000000000000000000000de0b6b3a7640000",
    "r": "0x057d733933b12238a2aeb0069b67c6bc58ca8eb6827547274b3bcf4efdad620a",
    "s": "0x00e49937ec81db89ce70ebec5e51b839c0949234d8aad8f8b55a877bd78cc293",
    "v": 1,
    "creates": null,
    "chainId": 31337
}
The transaction's receipt can be requested at the eth_getTransactionReceipt endpoint. Depending on the node you're running this query, it might be the case you also get additional information on top of the expected transaction receipt data. This is the transaction receipt I got from my local fork of mainnet:
{
    "to": "0x6B175474E89094C44Da98b954EedeAC495271d0F",
    "from": "0x6fC27A75d76d8563840691DDE7a947d7f3F179ba",
    "contractAddress": null,
    "transactionIndex": 0,
    "gasUsed": 34706,
    "logsBloom": "0x00000000000000000800000000000000000000000000000000000000000000000000000000000000000000000000000000000000000000000000000000000000000000008000000000000008000000000000000000000000000000000000000011000000000000000000000000000000000000000000000000000010000000000000004000000000000000000000000080000000000000000000000000000000000000000000000000000000000000000000000000000000000000000000000000000002000000000000000000000000000002000000000000000000000000000000000000800000000000000000000000000000000000000000000000000000",
    "blockHash": "0x8b6d44d6cf39d01181b90677f8a77a2605d6e70c40d649eda659499063a19c77",
    "transactionHash": "0xbf77c4a9590389b0189494aeb2b2d68dc5926a5e20430fb5bc3c610b59db3fb5",
    "logs": [
        {
            "transactionIndex": 0,
            "blockNumber": 15166167,
            "transactionHash": "0xbf77c4a9590389b0189494aeb2b2d68dc5926a5e20430fb5bc3c610b59db3fb5",
            "address": "0x6B175474E89094C44Da98b954EedeAC495271d0F",
            "topics": [
                "0xddf252ad1be2c89b69c2b068fc378daa952ba7f163c4a11628f55a4df523b3ef",
                "0x0000000000000000000000006fc27a75d76d8563840691dde7a947d7f3f179ba",
                "0x000000000000000000000000d8da6bf26964af9d7eed9e03e53415d37aa96045"
            ],
            "data": "0x0000000000000000000000000000000000000000000000000de0b6b3a7640000",
            "logIndex": 0,
            "blockHash": "0x8b6d44d6cf39d01181b90677f8a77a2605d6e70c40d649eda659499063a19c77"
        }
    ],
    "blockNumber": 15166167,
    "confirmations": 6, // number of blocks I waited before fetching the receipt
    "cumulativeGasUsed": 34706,
    "effectiveGasPrice": 9661560402,
    "type": 2,
    "byzantium": true,
    "status": 1
}
You saw that ? It says "status": 1.
That can only mean one thing: success!
Afterword
There's definitely far more to this story.
In some sense it's never-ending. There's always one more caveat. One more side note. An alternative execution path. Another node implementation. Another EVM instruction I might have skipped. Another wallet that handles things differently. All things that would take us one step closer to finding out "the real truth" behind what happens when you send 1 DAI.
Luckily, that's not what I intended to do. I hope the last +10k words did not make you think that 😛. Allow me to shed some light here.
In hindsight, this article is the byproduct of mixing curiosity and frustration.
Curiosity because I've been doing Ethereum smart contract security for more than 4 years, yet I hadn't took as much as time as I would've liked to manually explore, in depth, the complexities of the base layer. I really wanted to gain first-hand experience looking at the actual implementation of Ethereum itself. But smart contracts always got in the middle. Now that I've finally managed to found more peaceful times, it seemed the right time to go back to roots and embark on this adventure.
Curiosity wasn't enough though. I needed an excuse. A trigger. I knew what I had in mind was gonna be tough. So I needed a strong enough reason not only to get started. But also, more importantly, to get re-started whenever I would feel I was tired of trying to make sense out of Ethereum's code.
I found it where I wasn't looking. I found it in frustration.
Frustration at the absolutely mind-blowing lack of transparency we've grown so used to when sending money. If you've ever needed to do it in a developing country under increasingly strict capital controls, no doubt you feel me. So I wanted to remind myself that we can do better. I decided to channel my frustration in writing.
This article's also served me as a reminder. That if you can escape the fuzz, the price, the monkeys in JPEGs, the ponzis, the rugpulls, the thefts, there's still value in here. This is no "magic" internet money. There's real math, cryptography and computer science going. Being open source, you can see every single piece moving. You can almost touch them. No matter the day nor the time. No matter who you are. No matter where you come from.
So, I'm sorry for the clickbait-y title. This was never about what happens when you send 1 DAI.
It was about having the possibility to understand it.